Click here to order a Tri-Mode PCB (if in mode 3/4 your controller types like a keyboard, you do NOT have a Tri-mode PCB).
PCB Replacement Guide or Tri-Mode PCB replacement guide (by Arcade-One)
The original X-Arcade™ Joystick electronics PCB was designed as a keyboard, but new game controller modes (Xinput and DirectInput) have become popular since then. Now with the flip of the mode switch you can switch your X-Arcade™ between Keyboard Mode, DirectInput Mode, or Xinput Mode. You can then play with your X-Arcade™ as (2) Xinput Game Controllers or (2) DirectInput Game Controllers to support many devices such as the Nvidia™ Shield, Android-based consoles and TV boxes, Steam Link, Kodi, Raspberry PI™, dedicated emulation consoles and more. Below we give our recommendation for what to use each mode for, but some modes can be used for multiple devices.

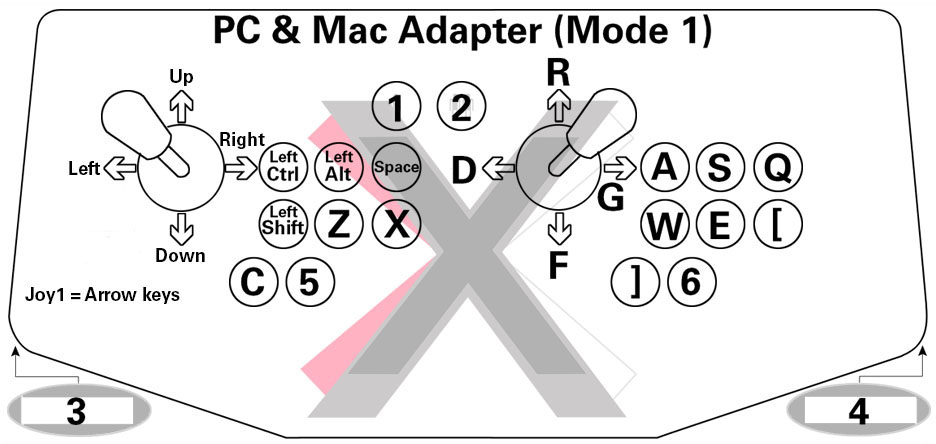
Keyboard (Mode 1): MAME™ for PC & Mac™, emulators that don't have game controller support
Keyboard Programmable (Mode 2): You can map any keyboard keys you want to any button or joystick direction.
Xinput (Mode 4): PC, Mac (requires 3rd-party software), Steam™ & Steam™ Link, VR/Oculus Rift™, Nvidia™ Shield, Raspberry Pie™, Kodi.
DirectInput: (Mode 3, we only recommend trying DirectInput mode when Xinput mode doesn't work for your device): PC, Mac™, Android™, Various Emulation Consoles, PlayStation™ 3 (limited functionality, not supported)
NOTE: The layout and instructions below requires the newest firmware update here.

Digital vs. Analog Control Overview:
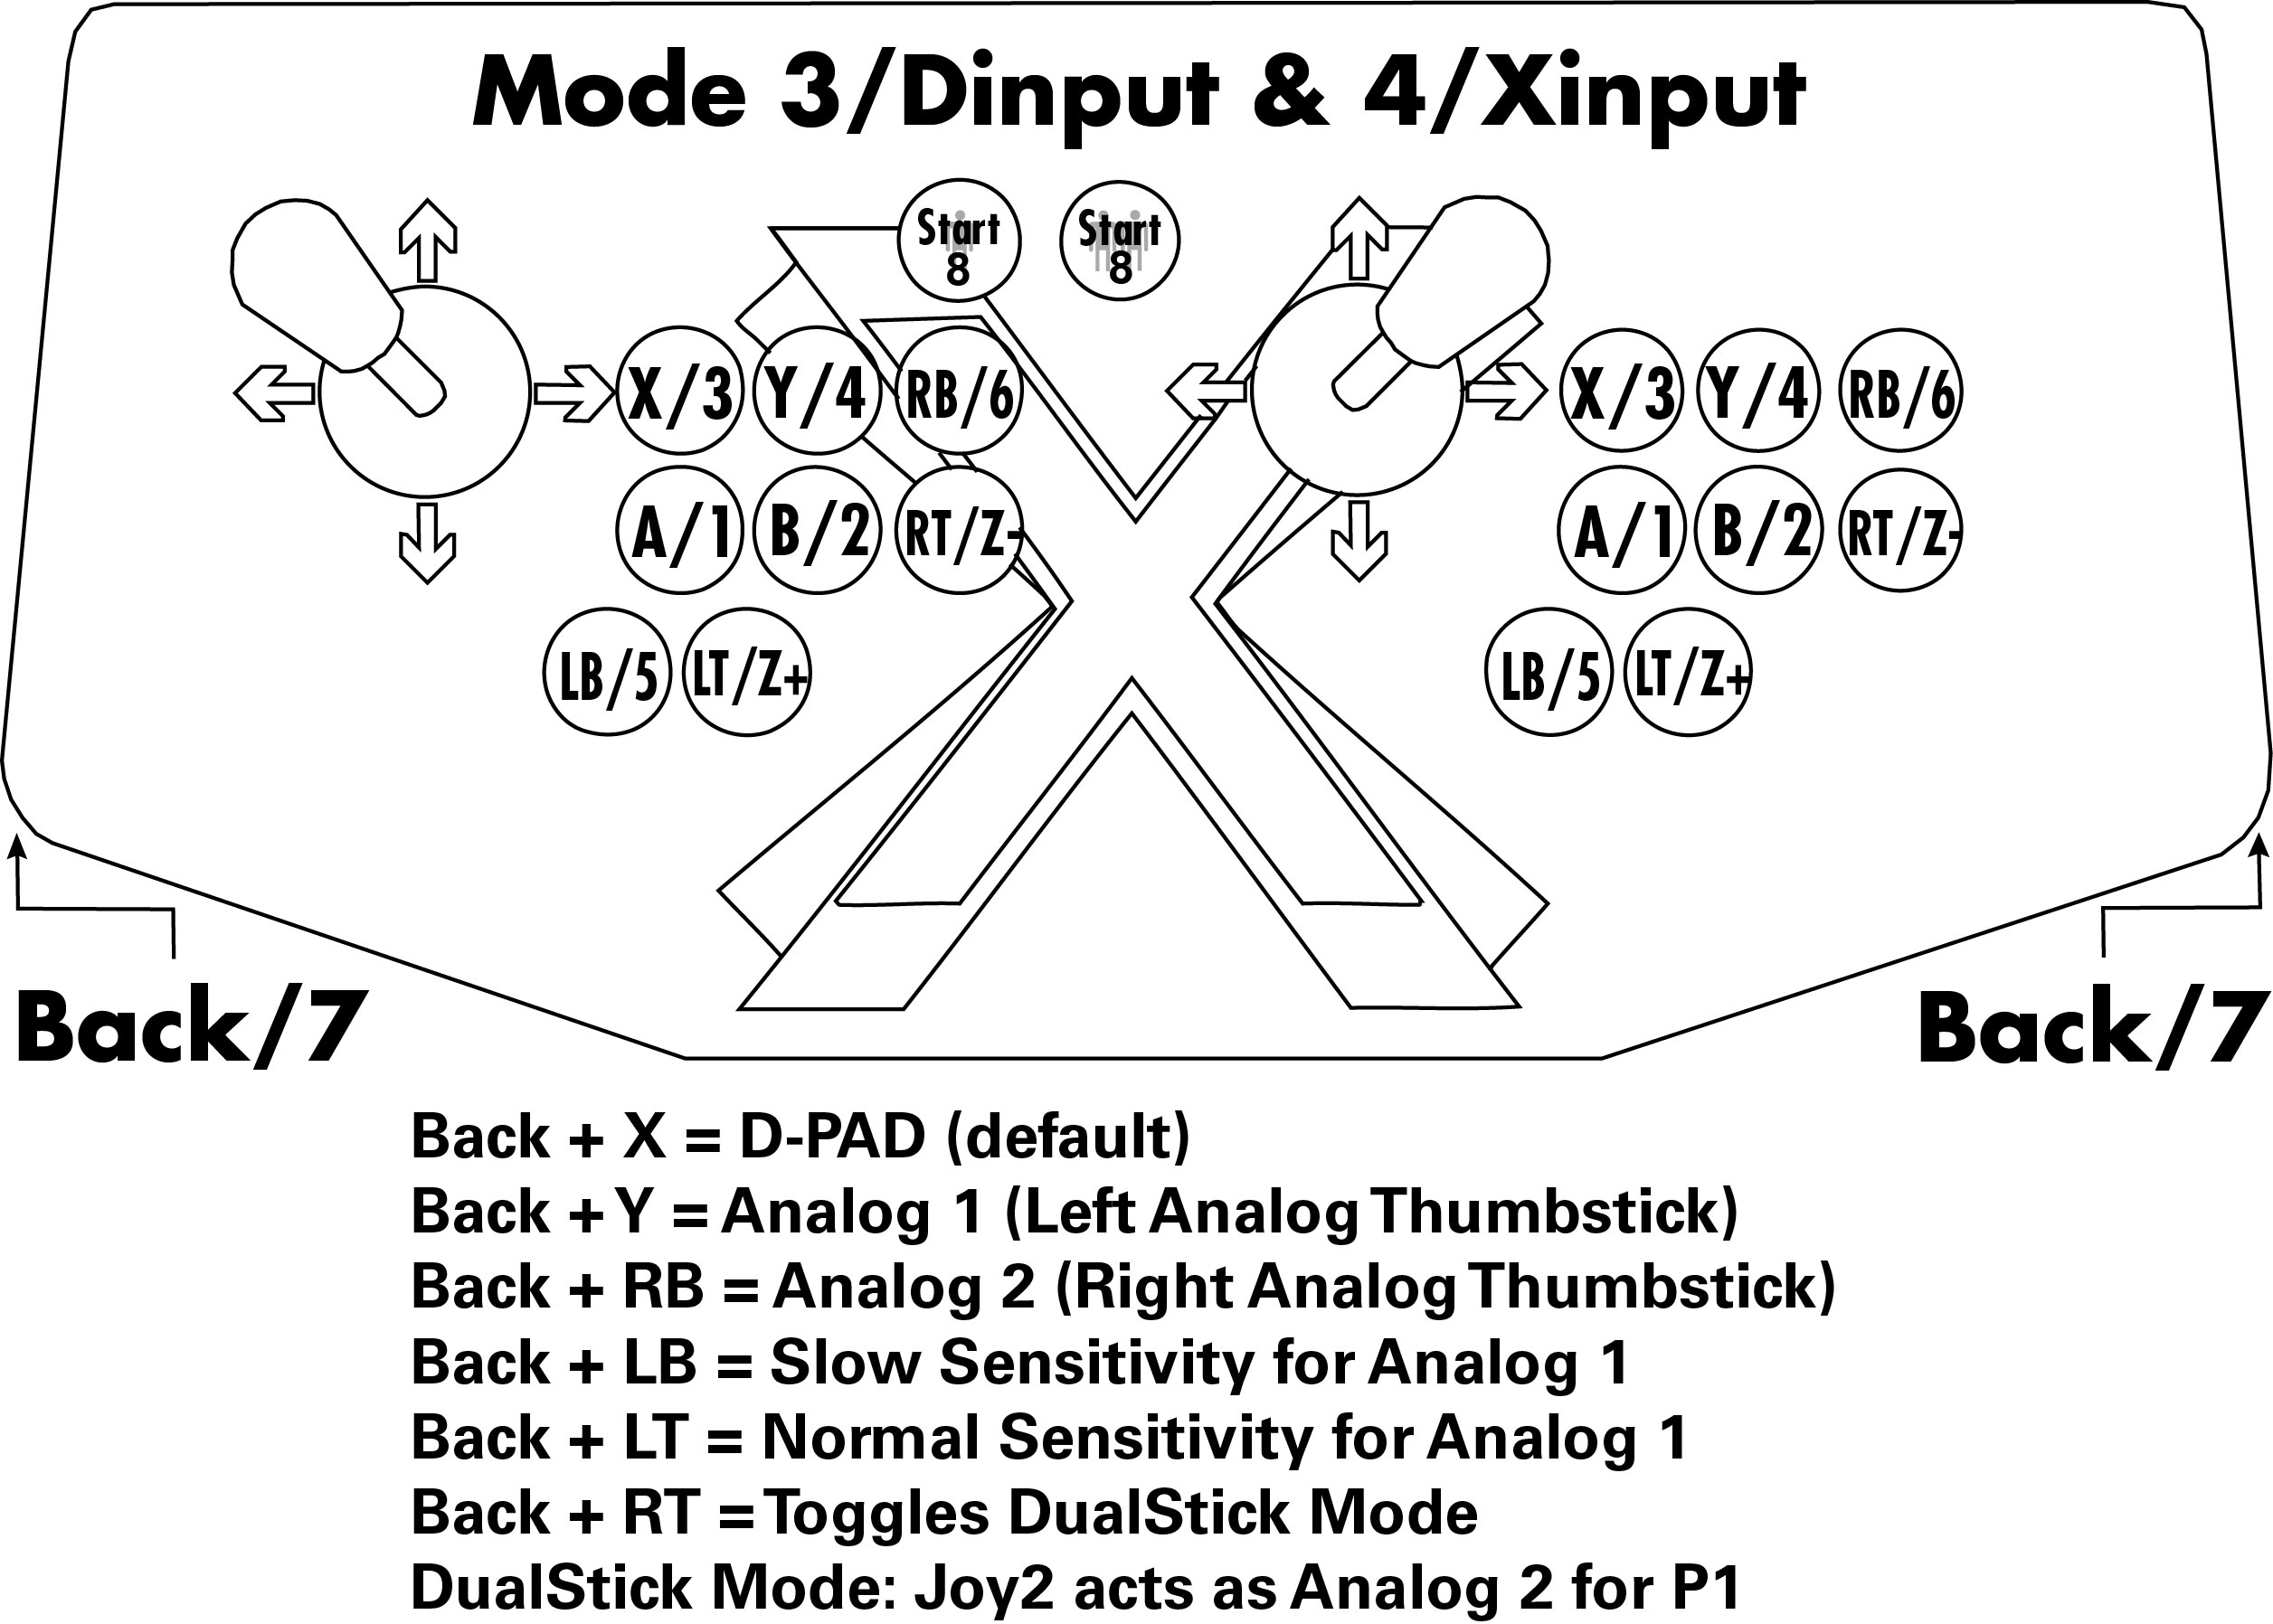
Handheld gamepad controllers for newer game consoles feature both digital and analog controlling devices, a D-pad and two analog thumb-sticks. Most games use the D-pad and/or left thumbstick to operate a game. The X-Arcade™ supports only one digital joystick per player, therefore adjustments need to be made to select whether this joystick functions as the D-pad or the left analog thumbstick. See the key legend above for directions on switching between analog and digital on the 360, but in general:
PM+ X (Top-left) = Digital (D-PAD)
PM + Y (Top-middle) = Analog 1 (primary thumbstick)
PM + LB (Top-right) = Analog 2 (secondary thumbstick)
Analog Tilt Sensitivity
While using Analog 1 mode (PM+Y) you can change how sensitive the movement is from normal full-tilt (default) to half-tilt sensitivity. Half-tilt sensitivity would be equal to moving the analog thumbstick on your gamepad to about halfway in any direction instead of fully (full-tilt). This is useful for games that you need more precise movement in, for example in a racing game, or to make your character move slower in your game.
Tilt Sensitivity Mode Toggle:
PM + LT = Half-Tilt Sensitivity
PM + RT = Full-Tilt Sensitivity (default)
 DualStick Mode (2-Player X-Arcades Only):
Some games may require the use of 2 control devices simultaneously, for example, console versions of arcade classics like Robotron™, SmashTV™, Crazy Climber™, and Karate Champ™. While the X-Arcade™ is not ideal for all types of games, for example, first-person shooters, it has the ability to play all of them thanks to DualStick Mode.
DualStick Mode makes the second player joystick of a dual X-Arcade™ act like the right analog thumbstick on a gamepad. But it also makes the buttons on the player 2 side mirror those of the player 1 side, so the buttons on both sides can be used for single-player game play. As you may have gathered, this means that DualStick mode is for single-person game play, and requires a 2-player X-Arcade™ controller, it will have no effect on an X-Arcade Solo™ for example.
DualStick mode is toggled on and off by pressing the PM button and button 6 (RB) simultaneously, and while in DualStick mode you can still change Joystick 1 between D-PAD and analog thumbstick mode.
TESTING
For testing Mode 1 (keyboard mode) and Mode 2 (Keyboard Programmed mode) you can use the X-Arcade Test Program.
To test your controller is working as an Xinput controller, download and run Xinput Test.
For DirectInput or Xinput you can test using either A) this web-based HTML5 Gamepad Tester, or B) press the Windows key on your keyboard (or click on the Start button) and search for "joystick" and open "Set up USB game controllers" (or similar depending on Windows version), then click Properties to test.
NOTE: If in mode 3 or 4 you are also getting keyboard outputs, that is being caused by Steam. To fix, go to Settings>Controller>General Controller Settings and uncheck to turn off 'Xbox Configuration Support'.
PROGRAMMING
The X-Arcade™ was designed to be used with a variety of games and emulators and will work with virtually any game or emulator on your PC in the default Mode 1 without programming. Always try first to change the control settings in the emu/game rather than programming so you don't have to remember which mode is set to which emu/game.
However, for the few PC games that do not allow you to reassign the keyboard keys within the game itself, you can instead use one of the programmable modes built into the hardware programming chip. Mode 1 is set for emulation software (MAME™) and is non-programmable. This setting is preset so that all of the buttons are already programmed and configured to work perfectly with every MAME™ game.
IMPORTANT PROGRAMMING NOTES:
- Before you attempt to reprogram your X-Arcade, test that it is working in Mode 1 first. At first, programming the X-Arcade™ is best performed in the X-Arcade™ Test Program or any text editor (like Notepad) so that you can see the results of the programming. As you become more accustomed to programming The X-Arcade™, it will be possible to program the X-Arcade™ 'on the fly' within a game.
- Programming is for the PC only and does not function on game consoles.
- When the light is on you are in play mode, when the light is off you are in program mode.
- MODE 1 (switch closest to the serial cable, or yellow wire on the switch itself), 3, and 4 cannot be programmed.
- The mouse buttons on the Tankstick/trackball cannot be programmed.
- For most emulators (including MAME™) you will want to use Mode1, and change any settings in the game or emulator accordingly. This saves; the programmable memory for games or emulators that do not have; an option to change the controls, and it is easier to remember.
PROGRAMMING OPTION 1 - WITH PROGRAMMING SOFTWARE (Tri-Mode PCB only)
On newer Tri-Mode PCBs and X-Arcade controllers with the Tri-Mode PCB only, mode 2 is programmable to any keyboard key. You can check if you have a Tri-Mode PCB by switching to mode 4 which will make the X-Arcade act as a gamepad instead of a keyboard.
- Download the X-Arcade Programming Software (PC only) and run it.
- Slide the switch on the back of the X-Arcade™ to Mode 2.
- Press the PM button on the back of the X-Arcade, the power light should go off and the software should now recognize that it was plugged in and is ready to program.
- Simultaneously press any button or direction and a single keyboard key you want to program until you see the light on the X-Arcade blink. Once it blinks it has been programmed, and you can release both held buttons/keys.
- Continue programming it per step 5, and once you are all done programming just press the Programming button on the back of the X-Arcade to exit programming mode (the light comes back on).
PROGRAMMING OPTION 2 - WITH A PS/2 KEYBOARD ATTACHED TO THE BACK OF THE X-ARCADE™
X-Arcade™ PS/2 Keyboard Programming Guide
FIRMWARE UPDATES
Tri-Mode flashing instructions here:
X-Arcade™ Firmware Update Download & Instructions
TROUBLESHOOTING
 The device stops working after leaving it for a time, unplugging it and plugging it back in fixes it (as does moving the mode switch):
This only happens in mode 4, and is caused by a Windows sleep setting. To fix it (refer to image on right):
- Open Device Manager and look under 'Human Interface Devices' for 'USB Input Device'. There will be several, so right-click on each and choose Properties to find the ones labeled XBOX_360_DEVICE_00:00 or 01 (you should see both, 1 for each player).
- For both of these click on the 'Power Management' tab and uncheck 'Allow the computer to turn off this device to save power',
- Press Ok to save.
Mode 3 or 4 is also outputting keyboard keys:
If in mode 3 or 4 you are also getting keyboard outputs, that is being caused by Steam. To fix, go to Settings>Controller>General Controller Settings and uncheck to turn off 'Xbox™ Configuration Support'.
Lag:
There is no lag caused from the Tri-mode PCB, none. So if you are experiencing lag here are some things to check:
- If you are using a TV for your display, use the 'Game' picture mode.
- Low refresh rate displays (high ms) will cause games to appear laggy. CRT displays and newer high refresh rate LCDs will not have this problem. Use a higher refresh display, or use the 'Game' picture mode as mentioned above if your display has one.
- 4-way games such as Donkey Kong and Pac-Man™ will miss inputs if you have your joysticks in 8-way mode. More info on 4-way vs. 8-way mode here.
- Emulation is not a perfect science and is CPU demanding, use the test methods and/or our Test program mentioned above to see the actual speed of our PCB instead of using an emulated game.
- D-Pad mode is best for fighting games when you have the option (which is most of the time).