
Find your issue: Power and input · Wireless and Bluetooth · Quest games and alignment · Buttons and remapping · Emulators and mouse · Charging and audio · Consoles · Service and accessories · Games and support
This guide is for Arcade2TV-XR MAX. Use it when controls, wireless connections, sound or game setup are not working as expected. Choose the symptom below and test after each step.
Start here: identify the two rear knobs
The left rear CONNECTION knob chooses how MAX connects. Its four indicator lights count from left to right:
- 1 — C (Console): cabled game controls. USB audio and USB accessories are disabled.
- 2 — W (Wired): USB data connection, including USB audio and accessories.
- 3 — BT (Bluetooth): direct Bluetooth connection.
- 4 — 2.4G (Receiver): connection through the supplied wireless receiver.
The right rear MODE knob selects the input profile. Its five indicator lights count 1–5 from left to right. This is separate from the P1 MODE and P2 MODE touch controls on the front.
- MODE 1: Keyboard. Use this for Pinball FX VR and Arcade Ranger on Quest.
- MODE 2: two-player DirectInput.
- MODE 3: two-player XInput over Wired/2.4G; two-player DirectInput over Bluetooth.
- MODE 4: single-player pinball profile; XInput over Wired/2.4G, DirectInput over Bluetooth.
- MODE 5: VPX profile combining keyboard, mouse and DirectInput functions.
Keyboard mode sends keys; DirectInput and XInput are gamepad formats. Pick the profile the game supports, then configure the game's inputs if needed.
MAX does not power on
- Connect the supplied 19 V power adapter firmly to MAX and a working wall outlet.
- Check both ends of the adapter's wall cord, then press MAX's POWER button.
- Disconnect optional USB accessories and try again.
- Note whether any controls, lights or audio respond. Dark decorative lighting alone does not prove that power is absent; check the lighting section below.
If MAX remains unresponsive, contact support with a photo of the adapter label and the connections. Use the supplied adapter; do not substitute a different voltage.
Lights are on, but the game receives no controls
- Connect MAX to the device that is actually running the game. A Quest running a standalone game receives the connection; a PC running PC VR receives it instead.
- Turn the left rear CONNECTION knob to match the cable, Bluetooth or receiver connection you are using.
- Turn the right rear MODE knob to the profile required by the game.
- For a wired test, use a data-capable USB cable directly to the computer. Remove optional hubs, extension cables and other accessories temporarily.
- Close and reopen the game after the controller is connected and the profile is selected.
- Test input outside the game as described below.
What the result means: if inputs register outside the game, concentrate on the game's input assignments and controller selection. If the same inputs fail on a direct connection to another computer, send those results to support.
How do I test buttons and joysticks on Windows?
For a keyboard test, turn the left rear CONNECTION knob to W (Wired) and the right rear MODE knob to 1 (Keyboard). Connect MAX by USB, open the keyboard tester and press one button at a time. Note which keys appear. Test trackball movement separately by watching the mouse pointer.
For a gamepad profile, press Windows + R, type joy.cpl, and press Enter. Select the controller, open Properties, then test its buttons and joystick. In a two-player profile, test each listed gamepad separately.
A successful input test confirms that the computer receives that input. It does not automatically assign the correct controls inside a game.
The supplied 2.4G receiver will not connect
The MAX receiver is paired before shipping. For normal use, plug it into the game-running device and turn the left rear CONNECTION knob to 2.4G (Receiver).
If the connection is lost:
- Check that MAX is powered and the receiver is plugged directly into the host's USB port. It fits directly into the supported Quest headset's USB-C port.
- If MAX cannot find the receiver, the indicator flashes white. Unplug and reconnect the receiver.
- If the receiver does not enter pairing automatically, hold its button for about 3–5 seconds while it is powered on.
- Wait for the flashing white indication to stop, then test input before opening the game.
If a battery strap, hub or extension is connected, test the receiver directly first. If direct connection works, add accessories back one at a time to identify the difference. Do not force a connector or leave heavy cables pulling on the headset port.
Bluetooth will not connect to a new device
- On the previous host, forget/remove the existing Bluetooth pairing so it does not keep reconnecting to MAX.
- Turn the left rear CONNECTION knob to BT (Bluetooth).
- Use the new host's Bluetooth settings to connect, then select the game's required profile with the right rear MODE knob.
- Test input before launching the game.
Bluetooth MODE 2 and MODE 3 both use two-player DirectInput. A game expecting XInput may need a different connection/profile. If pairing still fails, tell support what name appears in the host's Bluetooth list and whether the previous host was disconnected.
Can a receiver plugged into Quest control a game running on my PC?
Connect MAX or its receiver to the PC running the game. Plugging the receiver into Quest does not by itself route MAX's input to a separate PC through a VR-streaming app. First confirm that the PC receives MAX input, then configure the PC game.
For a game installed and running directly on Quest, connect MAX to Quest instead.
Pinball FX VR on Quest does not recognize MAX
- Power MAX with its supplied adapter. Use a supported connection: Wired, Console, Bluetooth or the supplied 2.4G receiver.
- Turn the left rear CONNECTION knob to match that connection and the right rear MODE knob to 1 (Keyboard).
- Establish the connection before launching Pinball FX VR. If the game was already open, close and relaunch it.
- Use the Quest controllers to select a table and press Play. Choose X-Arcade when the game offers the control-mode choice.
- Seat both Quest controllers fully in their MAX holders and complete alignment using the two middle side buttons, P1 button 7 + P2 button 7, together.
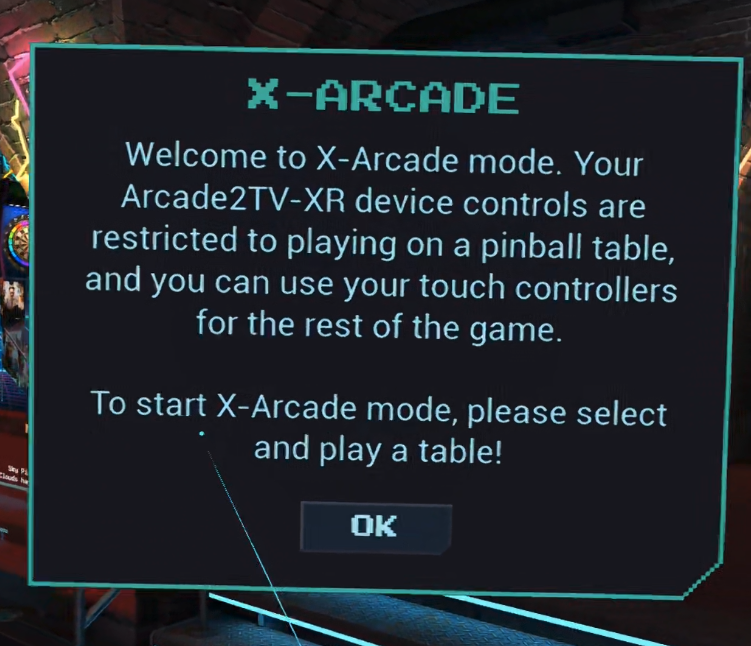
Example from the game's X-Arcade setup flow. Menu appearance can vary with game version.
If Quest receives input but the game gets stuck in setup, fully restart the headset, reconnect MAX and relaunch the game. Try a Classic table first. Keep the play area and headset boundary properly configured; do not disable the boundary to work around setup.
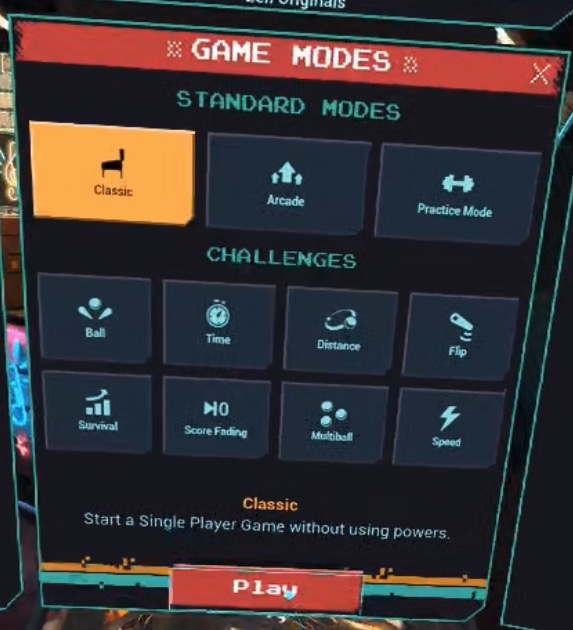
Select a table mode and press Play; Classic is a useful first test.
If input also fails outside the game, return to the connection checks instead of repeatedly adjusting the virtual table.
The virtual pinball table is misaligned
- Place MAX on a stable surface in its final playing position.
- Seat both Quest controllers fully in the holders.
- Stand or sit in the playing position facing MAX, then run the game's X-Arcade alignment flow again.
- Press P1 button 7 + P2 button 7 together. These are the middle buttons of the three on each side.
- Check the virtual and physical flippers before starting play. Realign after moving MAX.
The plunger identifies MAX's right-hand side. Left and right mean your left and right while standing or sitting in the playing position.
Arcade Ranger's cabinet is misaligned or controls stop after leaving a game
Use MODE 1 (Keyboard) with the right rear MODE knob. The left CONNECTION knob may use C, W, BT or 2.4G to match the connection.
To align the cabinet, press the two white Start buttons together: P1 Start/button 8 + P2 Start/button 8. This is different from Pinball FX VR's middle-side-button shortcut.
If you leave a running arcade game and MAX no longer controls it, return to Arcade Ranger's menu, select the game and choose Play again. Check Arcade Ranger's input configuration if individual actions are wrong. MAX's keyboard defaults are designed for Pinball FX VR; other software may need its own mapping.
The joystick acts like the wrong kind of stick
Press that player's front P1 MODE or P2 MODE touch control to switch its joystick between A-pad (analog stick) and D-pad output. Test the result in the game. These front controls do not change the rear connection or input profile. Front joystick-mode changes are lost at power-off.
Buttons repeat rapidly or turbo does not work as expected
Turbo repeats an action while its button is held in a game.
- Assign one button: hold the desired action button and press that player's TURBO while still holding it.
- Assign several buttons: hold those buttons together and press that player's TURBO.
- Clear selected buttons: hold the button or buttons to clear and press that player's TURBO again while still holding them.
Release the controls, then test. Turbo settings are lost at power-off.
The front touch controls do not respond
The touch panel may be locked. Hold the center X for 5 seconds, then release at the beep. The same action locks or unlocks it. Check this before treating unresponsive touch controls as a hardware fault.
The lighting is off, too dim or too fast
Press the rear LED button to cycle lighting effects. One effect is no light; choose another effect to turn lighting back on.
Hold the front X and use:
- P1 TURBO: brighter.
- P1 MODE: dimmer.
- P2 MODE: faster animation.
- P2 TURBO: slower animation.
Effects, brightness and speed are remembered after power-off. If only pedestal lighting is missing, turn power off and check its lighting cable connections before retesting. If the controls still work while decorative lights stay dark, include that distinction in your support request.
I want different button positions or need to undo a remap
On-device mapping exchanges two existing physical button assignments. Software remapping independently changes the key or function that a button sends.
For on-device mapping:
- Hold P2 MODE + P2 button 2 for 5 seconds. Release when RGB colors rotate rapidly. Button 2 is the middle button in P2's second action row.
- Hold the two buttons you want to swap together. Release after three white flashes. Repeat for other pairs.
- Hold P2 MODE + P2 button 2 for 5 seconds again to save and exit. Release when normal lighting returns.
To undo a swap, swap the same pair again and save. To restore the current mode's mapping, set the two rear knobs to the connection/profile to reset, then hold P2 MODE + P2 button 1 for 5 seconds. Button 1 is the left button in P2's second action row. Release after three red flashes. This resets that mode only.
For software assignments, firmware updates and software reset, use the web configurator and follow its instructions.
What are M1–M6, and why do they do nothing?
In the Wired/2.4G single-player MODE 4 mapping, these six customizable buttons are unassigned by default:
- Left side: M1 is the lower button toward the player; M2 is the upper button toward the speakers.
- Front/top P2 area: M3 is the far-right button in the upper action row; M4 is the far-right button in the second action row.
- Right side: M5 is the lower button toward the player; M6 is the upper button toward the speakers.
Enter on-device mapping using the steps above. Hold an existing button and the M button together, then save and exit. This copies the function to M and leaves the original working. For example, copy P2 button 1 to M1 or P1 button 3 to M2.
How do I update firmware or use the configurator on a Mac?
Open the Arcade2TV-XR web configurator in Chrome or Edge on Windows or macOS, with MAX connected by a USB data cable. Follow the tool's connection prompts.
Use its remapping options to assign supported keys/functions in Keyboard, DirectInput or VPX profiles. Choose Update Firmware if you want to update or support asks you to. Follow the instructions for the device and firmware offered by the tool; keep it connected until the update completes.
If the device does not appear, check the USB data cable, try a direct computer port, close other controller utilities and follow the configurator's device-not-listed help. Do not choose an older firmware file merely because another XR owner's ticket mentioned it. Send support the device name, current firmware and any error message if the tool cannot identify the correct update.
Only one player works in MAME, Batocera or RetroPie
For joystick/button games, start with the left CONNECTION knob at W (Wired) or 2.4G (Receiver) and the right MODE knob at 3 (two-player XInput).
- Check that the system receives two gamepads.
- Configure Player 1 in the frontend's controller/input settings.
- Test Player 2 separately. A matching profile may be reused, but verify player slots and configure P2 if needed.
- Launch a two-player game and check its own input assignments, including Start and Coin.
Bluetooth MODE 2/3 supplies DirectInput, so the emulator build must support that format. MODE 1 Keyboard also works with suitable software, but its Pinball FX VR defaults require input configuration for MAME. A working system menu does not guarantee the game's mappings are correct.
The trackball or spinners do not control a game
For a mouse-input diagnostic, use the left CONNECTION knob at W (Wired) and the right MODE knob at 1 (Keyboard). First check pointer movement outside the game.
The trackball and both spinners share one mouse device. Select that device in the emulator; changing mouse indexes does not split them into three independent devices.
- RetroArch-based emulators: select MAX's Mouse Index for the player, enable the core's mouse/trackball option if needed, and assign the game's analog axes.
- Batocera standalone MAME: enable mouse input in the game's advanced options, then assign the trackball or dial axes in MAME.
- MAME: enable mouse input and map Trackball X/Y or Dial Analog by moving only the control you are assigning.
Game support and menu names vary by emulator/core. If the pointer works outside the game, focus on emulator settings and axis assignments. Adding another mouse may change device indexes.
To toggle spinner control, hold P2 MODE + P2 button 3 for 5 seconds, then release. Button 3 is P2's upper-left action button. Repeat to toggle and test again.
One button fails, but other controls work
Test that button outside the game in the intended input profile. Check whether it was remapped or assigned turbo. Compare wired and wireless results if possible.
If the same physical button never registers in a direct computer test while the others work, contact support with the button's physical location and test results. Do not order a whole controller or open the panel just because a game action is missing. If support asks for an internal inspection, disconnect power and cables first.
Quest is not charging, or charging works but controls do not
MAX supports up to 24 W USB-C quick charging with a suitable OTG/data-compatible cable. Use the supplied 2-meter OTG quick-charge USB-C data cable for the intended headset connection and power MAX with its supplied 19 V adapter.
Charging alone does not prove that a cable carries controller data. If controls are missing, test with the supplied cable and remove optional hubs, battery straps and extensions temporarily. A replacement cable must support OTG and data as well as the required charging function. Report whether the issue affects charging, game input or both.
There is no sound from the speakers
USB audio is recommended.
- Turn the left CONNECTION knob to W (Wired) and connect MAX's USB data cable to Quest, Windows PC or Mac.
- Unplug any cable from AUX IN. AUX IN takes priority over USB audio, even if the connected source is silent.
- Quest selects USB audio automatically. On Windows or Mac, choose X-Arcade Audio in the system's sound output settings if needed.
- Start audio and raise the AUD knob gradually. AUD controls speaker volume.
If USB audio is unavailable, connect a 3.5 mm audio cable from the source's headphone/audio output to MAX's AUX IN. Confirm the source is actually sending sound through that jack, then adjust AUD. The C (Console) connection setting does not carry USB audio.
If AUX sound hums or cuts out, reseat the cable, test a known-good stereo cable and temporarily remove optional splitters. Report whether the noise remains with AUX unplugged. Do not assume an internal board needs replacement before checking the audio path.
Headphones are loud, or the speakers keep playing with headphones connected
MAX's headphone output is fixed at maximum volume. Use headphones with their own volume control and turn that control down before connecting them.
Plugging in headphones does not automatically mute the speakers. Turn down AUD separately for private listening. AUD does not control headphone volume. Vibration remains available with headphones connected; adjust it using VIB.
Vibration, solenoid knock or nudge is missing
These controls do different jobs:
- VIB knob: adjusts vibration intensity.
- SOL button: enables the solenoid knock effect.
- ACC button: enables nudge sensing.
SOL and ACC are independent latching buttons: pressed in/flush with halo lit = on; popped out with halo unlit = off. Press again to change state. Their physical positions are retained after power-off.
Check the appropriate control and whether the game supports the function. Plunger and nudge settings are fixed and require no tuning. For an axis-input test, use a supported gamepad profile in Windows controller Properties, then compare the result with the game's assignment. If the input is detected there but not in the game, check the game's mapping before treating it as a hardware failure.
Console controls or the second console player do not work
Use the left CONNECTION knob at C (Console) and the correct adapter route:
- One player: rear USB-C → supplied USB data cable → suitable Brook adapter → console. Use the right MODE knob at 4.
- Two players: rear USB-C → USB data cable → supplied DB9 converter → two-player adapter kit → separate P1/P2 Brook adapters → console USB ports. Use the right MODE knob at 1.
Register each player by pressing that player's middle side button 7 + white Start button 8 together. Test one player at a time. Xgaming sells two-player console adapter kits; individual Brook adapters are purchased from Brook.
Adapter model, adapter firmware and console/game compatibility matter. Check the Brook Wingman range and Xgaming adapter kits for the platform you own. Console mode does not provide USB audio or USB accessory passthrough. A console recognizing a controller does not guarantee every game supports every MAX control.
The trackball feels rough or moves slowly
Use the trackball service video before dismantling the assembly. Turn off MAX and unplug power and external cables before service. The ball does not simply lift out of the assembled deck.
Cleaning the ball and internal rollers may restore smooth movement. Keep housing parts supported, keep screws grouped, allow cleaned surfaces to dry fully, and do not pull wiring. If the ball rolls smoothly but the pointer does not move, perform the input test above rather than assuming that cleaning will fix it.
Can I use my original XR pedestal, and how do I fit MAX?
MAX fits the official pedestal made for the original Arcade2TV-XR. Confirm compatibility with support if your stand is a different model or a third-party product.
Watch the pedestal assembly video, starting at 3:40. Use two adults, disconnect power/cables, keep the panel supported and confirm the locks and fasteners are secure before play. Do not move the stand with a headset or headphones hanging from its hooks.
Where are the spare grips, tools and restrictor gates?
Check the underside storage compartments, including behind the foam. MAX includes spare oval grips, joystick tools and spare 4-way, circular and octagonal restrictor gates. Standard square eight-way gates are fitted.
To change a grip, lift the washer, hold the shaft steady with the supplied wrench, unscrew the grip counterclockwise and fit the replacement clockwise. Refer to the manual's illustrated maintenance instructions for opening the panel or changing a gate. Close the storage compartments before moving MAX.
Where are my included games or redemption emails?
Use the supplied redemption code at the game activation page, verify your email and follow the game redemption emails. Check spam/junk if they do not arrive. If redemption remains incomplete, contact support with your order and activation details privately.
Arcade Ranger and Pinball FX VR redemption codes are included with MAX. If you already own either game, contact support for the $5 refund per game. MAX is a controller; your headset, computer or console runs the game. Xgaming does not sell game ROMs.
If it still does not work after these steps
Email support@xgaming.com with:
- Confirmation that the product is Arcade2TV-XR MAX, plus a photo of the unit/rear panel if unsure.
- The headset, computer or console; operating system; game/emulator and version.
- The left CONNECTION setting and right MODE number.
- The exact symptom and which buttons or functions are affected.
- Whether a direct USB test works, whether wireless differs, and what the indicators do.
- Firmware version if known, any error message, and the checks already tried.
- A short video or clear photos that show the issue.
Send order numbers and contact details privately to support. Keep one ticket for the same issue so the troubleshooting history stays together.